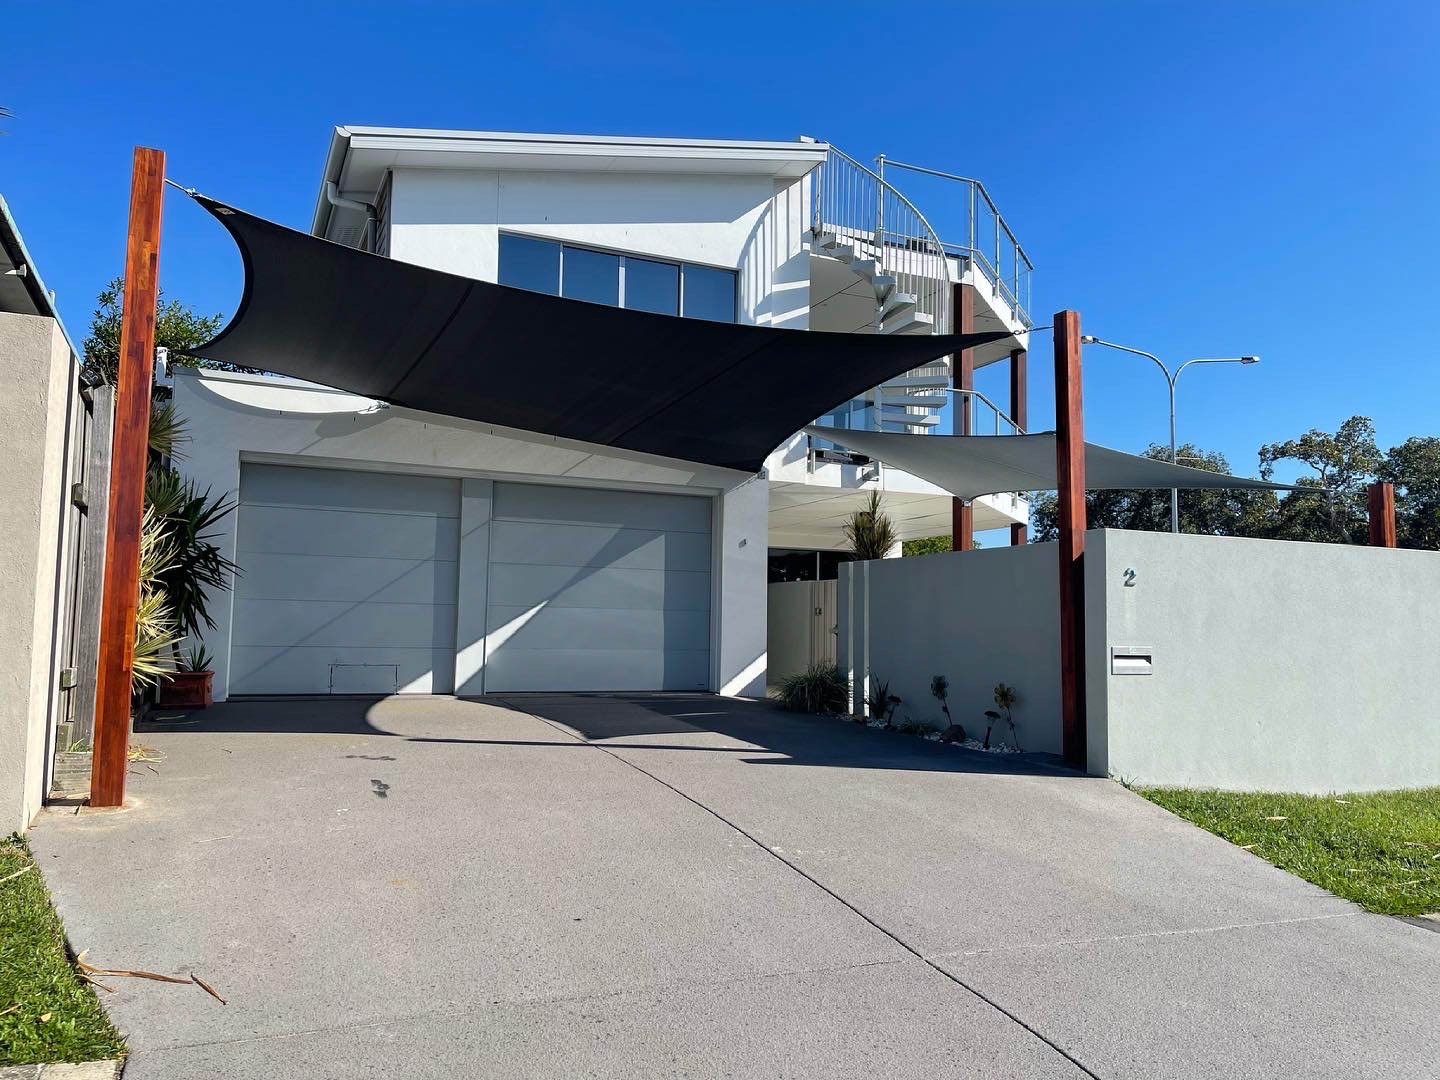
Yes, a shade sail over a driveway absolutely works, and done right, it can block up to 98% of UV radiation, keep your car’s interior noticeably cooler, and add real kerb appeal to your home. The catch is that driveways have unique challenges: they’re often exposed to wind, they need clear vehicle clearance underneath, and anchoring points aren’t always obvious. This guide covers everything you need to know before you buy.
Why Install a Shade Sail Over Your Driveway?
A shade sail isn’t just about keeping the sun off. It’s a multi-benefit investment that pays for itself faster than most people expect.
Protecting Your Vehicle from UV Damage and Heat
Prolonged sun exposure fades paint, cracks dashboards, degrades rubber seals, and can warp interior plastics. On a 30°C day, the inside of a parked car can hit 60–70°C, well above the threshold that causes lasting damage to upholstery and electronics. A quality shade sail can reduce the surface temperature of your car by 20–30°C, which means cooler seats, a longer-lasting interior, and less strain on your air conditioning when you get in.
Keeping the Driveway Surface Cool and Intact
Concrete and asphalt expand and contract with heat. Repeated thermal cycling accelerates cracking, especially in Queensland’s intense summer sun. Shade reduces peak surface temperatures, which slows that cycle and extends the life of your driveway surface.
Aesthetic Appeal and Curb Value
A well-designed shade sail looks far more attractive than a clunky prefab carport. With the right shape, colour, and tension, it becomes an architectural feature, not an afterthought. Buyers notice it too. Covered outdoor parking is a genuine selling point in the Australian market.
Is a Shade Sail Suitable for a Driveway?
Most driveways can accommodate a shade sail, but a few factors will shape your design choices.
Driveway Size and Shape
Standard single-car driveways run roughly 2.7–3.5 m wide and 5–6 m long. Double driveways are 5.5–7 m wide. You’ll need at least 2.4 m of clearance height for a standard vehicle, and 3 m+ for SUVs, vans, or trailers. Measure your actual driveway, not just the car, you need room for doors to open and for people to walk around the vehicle.
Wind Exposure and Local Weather Conditions
Driveways are often more exposed than patios or backyards. If your driveway faces the prevailing wind direction, you’ll need a sail tensioned tightly and anchored to posts with adequate concrete footings. A loose or under-tensioned sail flaps, wears out fast, and can become a hazard in strong gusts. Shade sails can withstand strong winds when they’re correctly installed, the key word is “correctly.”
HOA Rules and Local Council / Building Permits
In most Australian states, a shade sail is classified as a temporary or non-structural shade structure and doesn’t require a building permit, provided it meets certain size and height limits. However, rules vary by council and state. If you’re in Queensland, check the specific thresholds before you start digging post holes. Our detailed guide on council approval for shade sails in QLD walks through exactly what applies and when.
Shade Sail vs. Carport vs. Pergola, Which Is Better?
Each option has its place:
- Shade sail: Lower cost, faster install, better aesthetics, more airflow. Doesn’t provide full rain protection.
- Carport: Solid roof means full weather protection, but it’s more expensive, requires a permit almost everywhere, and looks utilitarian.
- Pergola: Great for attached structures near the house, but rarely practical over a full driveway length.
For pure sun and UV protection at a reasonable price point, a shade sail wins. If you need to keep your car dry in heavy rain, a carport or solid-roof structure is the better fit. For a deeper comparison, see our article on shade sails vs pergolas.
Choosing the Right Shade Sail for Your Driveway
Shape Options, Triangle, Square, and Rectangle
- Triangle: Versatile and stylish. Works well for single-car driveways or as part of an overlapping multi-sail setup. Easier to tension correctly because it has three anchor points.
- Square: Good coverage for a compact double driveway. Four anchor points mean more even tension distribution.
- Rectangle: The most practical shape for a standard driveway. Covers a long, narrow area efficiently and is easy to size to your exact dimensions.
For most single driveways, a rectangle or triangle is the go-to. For wide or irregular driveways, two overlapping triangles often give better coverage and a more dynamic look than one large square.
Sizing Guide: How to Measure Your Driveway
Add 0.5–1 m to each side of the area you want covered, shade sails attach at their corners, so the fabric doesn’t reach all the way to the anchor points. A driveway that’s 3 m wide by 6 m long typically needs a sail around 4 m x 7 m to provide adequate coverage. Always measure the full area including where passengers step out, not just the car footprint.
Material and UV Rating, What to Look For
Look for a shade cloth rated at 90% UV block or higher for driveway use. High-density polyethylene (HDPE) knitted fabric is the industry standard, it’s breathable, resists mould, and handles Australian conditions well. Understanding shade sail UV ratings is worth a read before you commit to a fabric. Mister Shade uses Rainbow Shade Z16 fabric, which is engineered specifically for the Australian climate with high UV block ratings and long-term colour stability.
Colour Choices and Heat Reflection
Lighter colours reflect more radiant heat but show dirt faster. Darker colours absorb more heat but tend to look sharper and hide grime. For a driveway, where dust and tyre splash are inevitable, a mid-tone grey, charcoal, or sand shade is usually the practical sweet spot. Whatever you choose, UV-stabilised pigment is non-negotiable in Queensland sun.
Anchoring a Shade Sail Over a Driveway
This is where most DIY installs go wrong. Under-anchored shade sails are dangerous and short-lived.
Using Existing Structures
If your driveway runs alongside your house or garage, wall-mounted brackets can serve as anchor points on one or two sides. This saves on post costs and can look very clean. Make sure the wall is structurally sound and that fixings go into solid masonry or timber framing, not just render or cladding.
Installing Freestanding Posts
When there are no suitable walls nearby, you’ll need to set posts. For a standard driveway sail, posts are typically placed 0.5–1 m outside the sail’s corner points to allow for the correct angle of tension. Posts should lean slightly outward (around 10°) away from the sail to handle the inward pull of the tensioned fabric.
Post Material, Steel vs. Timber vs. Aluminium
| Material | Pros | Cons |
|---|---|---|
| Steel (galvanised or powder-coated) | Strong, durable, slim profile | Can rust if coating chips; heavier |
| Timber | Affordable, natural look | Requires treatment; can rot over time |
| Aluminium | Lightweight, corrosion-resistant | Less rigid; higher cost |
For driveway installs, galvanised steel is the most popular choice. It handles tension loads well and, with a quality powder coat, lasts 15–20 years with minimal maintenance.
Footing Depth and Concrete Requirements
Post footings for a driveway shade sail should be at least 600 mm deep, and ideally 800–900 mm for taller posts or high-wind areas. Use a minimum 20 MPa concrete mix. The general rule is that the footing depth should be roughly one-third of the total post length. Don’t skip this step, inadequate footings are the number one cause of shade sail failures.
Step-by-Step Installation Guide
Tools and Materials You’ll Need
- Post hole digger or auger
- Concrete mix
- Spirit level and string line
- Drill and masonry/timber bits
- D-rings, snap hooks, turnbuckles, and shackles
- Shade sail
- Shifting spanner and pliers
Step 1: Plan Your Anchor Points and Tensioning Direction
Mark out your anchor points with stakes. Check that the sail will sit at a slight angle (a pitch of at least 20° from horizontal) so rainwater runs off rather than pooling. Confirm vehicle clearance height at the lowest point.
Step 2: Set Posts or Attach Wall Brackets
Dig post holes to the required depth. Set posts in concrete, check they’re plumb and angled correctly, and allow the concrete to cure for at least 48 hours before applying any load. For wall brackets, drill into solid substrate and use appropriate stainless steel or galvanised fixings.
Step 3: Attach Hardware
Fix D-rings or eye bolts to the top of each post. Connect turnbuckles, these are what you’ll use to tension the sail. Use shackles to link the sail’s corner rings to the turnbuckles. Make sure all hardware is rated for the load and is marine-grade stainless or galvanised to resist corrosion.
Step 4: Hang and Tension the Shade Sail
Attach the sail to all anchor points loosely first, then gradually tension each turnbuckle in sequence, a little at a time, working around the sail rather than fully tightening one corner before moving to the next. The sail should be drum-tight with no visible sag, ripples, or flutter. A slight, even curve at each edge is normal and correct.
Step 5: Final Safety Check
- Tug each connection point firmly to confirm nothing moves.
- Check that no part of the sail or hardware is within reach of a vehicle door swing.
- Inspect the pitch, water should run off cleanly at one or more corners.
- Re-tension after the first week; new sails and hardware settle slightly.
Shade Sail Over Driveway: Cost Breakdown
Shade Sail Purchase Price
| Type | Approximate Cost |
|---|---|
| Budget off-the-shelf sail (3–4 m) | $80 – $250 |
| Mid-range sail (4–6 m) | $250 – $600 |
| Custom-made shade sail | $600 – $1,500+ depending on size |
Custom sails are cut to your exact dimensions and use commercial-grade fabric, a worthwhile investment for a driveway where fit and durability matter. For a full breakdown of what drives pricing, see our guide on how much a custom shade sail costs in Australia.
Post and Hardware Costs
- Steel posts (per post, supply only): $80 – $200
- Concrete and footings (per post, DIY): $20 – $50
- Hardware kit (turnbuckles, D-rings, shackles): $80 – $200
Budget roughly $400 – $800 for a two-post freestanding setup with all hardware.
DIY vs. Professional Installation
A confident DIYer can install a shade sail over a weekend. But driveway installs often involve concrete footings, heavy posts, and precise tensioning, mistakes are costly to fix. Professional installation typically adds $500 – $1,500 to the project, depending on complexity and your location. For most homeowners, that’s good value for the peace of mind and warranty protection it brings.
Maintenance and Longevity Tips
Cleaning Your Shade Sail
Brush off loose debris regularly. For a deeper clean, use a soft brush, mild detergent, and cold water. Avoid pressure washing at close range, it can damage the fabric weave. Rinse thoroughly and let the sail dry fully before re-tensioning.
Removing and Storing It in Winter or High-Wind Seasons
Quality shade sails are designed to stay up year-round, but if you’re in a cyclone-prone area or experience severe storms, taking the sail down seasonally extends its life significantly. Fold loosely (don’t crease sharply), store in a dry bag or shed, and check the hardware for corrosion before re-hanging.
When to Replace a Shade Sail
A well-made, UV-rated shade sail lasts 10–15 years with proper care. Signs it’s time to replace include:
- Visible fabric thinning or holes
- Significant fading that can’t be cleaned off
- Fraying at the edges or around corner rings
- Loss of UV block (you’ll notice more sun penetration)
Shade Sail Ideas and Inspiration for Driveways
Single Sail for a Single-Car Driveway
A single rectangle or triangle sail, anchored to the house wall on one side and a single freestanding post on the other, is the cleanest and most cost-effective setup. It keeps the driveway open and uncluttered.
Overlapping Sails for Double or Wide Driveways
Two triangles overlapping at the centre give excellent coverage for a double driveway while creating a layered, architectural look. The overlap also reduces the gap where direct sun can sneak through.
Modern vs. Rustic Aesthetic Styles
- Modern: Charcoal or slate grey sail, powder-coated steel posts, stainless steel hardware. Clean lines, minimal fuss.
- Rustic/coastal: Sand or natural tone sail, treated timber posts, rope-style tensioners. Suits beach houses and heritage properties.
For more design inspiration, our article on the best shade sail designs for your home patio has plenty of ideas that translate equally well to driveways.
If you’re ready to explore options, the team at Mister Shade can design and install a custom shade sail tailored to your exact driveway dimensions, from a single residential sail to a multi-sail setup for a commercial property.
Frequently Asked Questions
Do I need council approval to install a shade sail over my driveway?
In most Australian states, a shade sail under a certain size and height doesn’t need a permit, but the rules vary by council. Check with your local authority before starting, or read our guide on council approval requirements to understand what applies in your area.
How do I stop my driveway shade sail from sagging or flapping?
Correct tensioning is the key. Tighten each turnbuckle gradually and evenly, working around all corners rather than fully tightening one at a time. The sail should be drum-tight with a slight pitch so water drains off. Re-tension after the first week, as new sails settle.
Can a shade sail handle rain as well as sun over a driveway?
Shade cloth fabric is permeable, so it won’t stop heavy rain. It will reduce light drizzle and significantly cut wind-driven rain, but for full waterproofing you’d need a solid-roof carport or awning. If occasional light rain protection is enough, a shade sail works well, especially with a good pitch angle to encourage runoff.